
Why ignoring your transfer case fluid is a costly mistake
The Costly Mistake Mercedes and BMW Owners Make With Their Drivetrain
Transfer case fluid replacement is one of the most overlooked maintenance tasks on any 4WD or AWD vehicle — including German luxury cars like Mercedes-Benz and BMW.
Quick Answer: Transfer Case Fluid Replacement at a Glance
Question Answer How often should I replace it? Every 30,000–60,000 miles under normal conditions Severe use (off-road, towing)? Every 20,000–25,000 miles What fluid do I need? Varies by vehicle — check your owner's manual Can I do it myself? Yes, with the right tools and safety precautions What happens if I skip it? Overheating, gear wear, and costly drivetrain failure
Most drivers know to change their engine oil. Far fewer think about the fluid inside their transfer case — until something goes wrong.
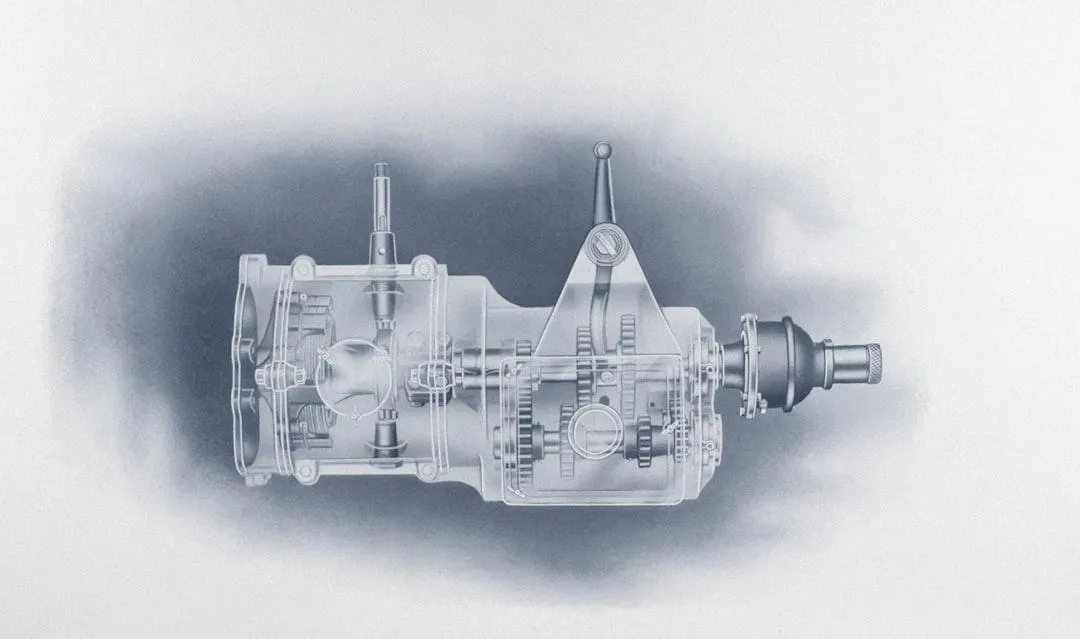
The transfer case is the gearbox that splits power between your front and rear axles. Like any gearbox, it relies on fluid to lubricate its internal parts, carry heat away, and keep metal components from grinding against each other. Over time, that fluid breaks down. Heat, mechanical wear, and contamination degrade it until it can no longer protect the components it was designed to serve.
The result? Increased friction, premature wear, overheating — and repair bills that dwarf the cost of a simple fluid change.
For owners of Mercedes-Benz and other German vehicles, the stakes are even higher. These are precision-engineered machines with tight tolerances and specific fluid requirements. Using the wrong fluid, or letting the right fluid go too long, can cause damage that specialized diagnostics are needed to catch before it becomes catastrophic.
This guide walks you through everything you need to know — from warning signs and service intervals to the step-by-step replacement process and when to hand the job to a professional.

What is a Transfer Case and Why Does the Fluid Matter?
If you drive a four-wheel-drive (4WD) or all-wheel-drive (AWD) vehicle, your transfer case is the unsung hero of your drivetrain. Positioned right behind your transmission, this specialized auxiliary gearbox receives power directly from the engine and splits it, sending power to both the front and rear axles. Whether you are driving a robust Mercedes G-Wagon or an AWD BMW xDrive sedan, the transfer case is what keeps all four wheels working in harmony to maximize traction and road grip.
Inside that compact metal housing is a complex arrangement of gears, chains, and bearings. As you drive, these heavy metal components spin at incredible speeds, creating massive amounts of friction and heat.
This is where the transfer case fluid steps in. It serves three critical functions:
Gear Lubrication: It coats every gear tooth, bearing, and chain link in a protective film, preventing metal-on-metal contact.
Heat Dissipation: It draws intense operational heat away from the delicate internal gears and transfers it to the outer housing, preventing the unit from melting itself.
Wear Prevention and Cleaning: It sweeps away tiny microscopic metal shavings that naturally shed during operation, trapping them so they do not chew up your gears.
Ignoring this fluid is incredibly risky. As the fluid ages and experiences thousands of heat cycles, its viscosity breaks down. It loses its ability to lubricate, turning from a slick protective oil into a thin, watery liquid—or worse, a thick, contaminated sludge.
Understanding the difference between Scheduled Maintenance vs Preventive Maintenance is key here. While your manual might list a scheduled interval, checking and swapping this fluid early is the ultimate preventive insurance policy against a multi-thousand-dollar drivetrain replacement.
Signs and Intervals: When Does Your Vehicle Need Service?
Because the transfer case lives quietly under your vehicle, it is easy to forget it even exists. But your fluid does not care if it is out of sight. Over time, fluid breakdown is inevitable.
How do you know when it is time to schedule a service? Let's take a look at the typical maintenance schedules. Depending on how you drive, your vehicle will fall into either "normal" or "severe" service categories.
Driving Condition Recommended Service Interval Action Required Normal Service (Highway commuting, mild weather) Every 30,000 to 60,000 miles Full fluid drain and refill Severe Service (Frequent towing, off-roading, extreme heat) Every 20,000 to 25,000 miles Inspect fluid condition; replace early Water Exposure (Fording deep puddles, floods) Immediately Drain and replace to avoid water damage
When to Schedule a Transfer Case Fluid Replacement
For the vast majority of passenger vehicles, manufacturers recommend a transfer case fluid replacement somewhere between the 30,000 and 60,000-mile mark. Keeping an eye on this is an essential part of staying on top of your Scheduled Maintenance Guide 2026.
However, do not rely solely on mileage. Keep your ears and hands tuned to how your vehicle behaves. If you begin to notice any of the following symptoms, your transfer case is crying out for fresh fluid:
Strange Noises: A low humming, growling, or high-pitched whining noise coming from directly beneath the center console is a classic sign of dry, unlubricated gears.
Shifting Difficulty: If your vehicle hesitates, jerks, or struggles when shifting between 2WD and 4WD modes (or if your AWD system feels clunky), the fluid is likely degraded or low.
Vibrations: Severe shuddering or vibrations during acceleration or tight turns can indicate internal wear caused by bad fluid.
Puddles Under the Vehicle: A dark, oily spot on your driveway directly under the center of your car means a seal has failed, and your transfer case is actively running dry.
How Severe Driving Conditions Impact Your Fluid
If you use your vehicle for more than just a casual grocery run, your fluid-change timeline changes dramatically. Severe driving conditions accelerate fluid breakdown.
For example, heavy towing puts immense strain on the entire drivetrain, driving up temperatures inside the transfer case to extreme levels. Similarly, off-roading forces the system to constantly shift power back and forth to maintain grip, creating rapid friction.
But the silent killer of transfer cases is water. If you live in a low-lying area of South Florida prone to heavy rains, or if you take your vehicle through deep water crossings, water can seep into the transfer case through its breather vent. Water emulsifies the oil, turning it into a useless, milky-looking mixture that offers zero lubrication. If you suspect your vehicle has been exposed to deep water, you must perform a fluid change immediately. For a deeper look at protecting off-road drivetrains, check out How To Fill A Transfer Case – Maintain Your 4X4 For Peak Off-Road.
Step-by-Step Guide to Transfer Case Fluid Replacement
If you have some mechanical experience, a flat driveway, and a weekend afternoon, changing your transfer case fluid is a highly rewarding DIY project. It is often simpler than a standard engine oil change because there are no messy oil filters to wrestle with.

Essential Tools and Safety Precautions
Before you slide under your vehicle, you need to gather the right gear. Never cut corners on safety—especially when working underneath a heavy vehicle.
Here is your essential DIY toolkit:
High-Quality Jack and Heavy-Duty Jack Stands: Never work under a car supported only by a hydraulic jack.
Wheel Chocks: To prevent the vehicle from rolling.
Fluid Transfer Pump: Essential for getting new fluid up and into the fill hole.
Socket Wrench and Correct Hex/Allen Bits: (Often 10mm hex, but check your vehicle's specifications).
Torque Wrench: To ensure you do not strip the soft aluminum threads on the transfer case housing.
Drain Pan: To catch the old fluid.
New Crush Washers/Gaskets: For both the drain and fill plugs.
Safety Glasses and Gloves: To protect yourself from chemical splashes.
Brake Cleaner and Clean Rags: To prep the surface and clean up spills.
A quick safety note: Make sure you are parked on a perfectly level surface. If the vehicle is tilted on jack stands, you will not be able to get an accurate fluid level reading when refilling.
The Draining and Refilling Process
Ready to get dirty? Follow this step-by-step guide to get the job done right. For extra visual guidance, you can also consult How to Replace Transfer Case Fluid: A Step-by-Step Guide - Engineer Fix .
Warm Up the Fluid: Take your vehicle for a quick 10-to-15-minute drive. Warm fluid flows much faster and carries away suspended metal contaminants far better than cold, thick oil.
Secure the Vehicle: Park on level ground, engage the parking brake, place wheel chocks behind the tires, and safely raise the vehicle on jack stands.
Locate the Plugs: Locate the transfer case. You will see two plugs on the side of the housing: a higher one (the fill plug) and a lower one (the drain plug). If your vehicle has a skid plate protecting the drivetrain, you will need to remove it first.
CRITICAL STEP - Remove the Fill Plug First: Always loosen and remove the top fill plug before touching the bottom drain plug. Why? If you drain all your fluid first and then discover your fill plug is rusted shut or stripped, your vehicle is completely stranded. You will have no way to put new fluid back in!
Drain the Old Fluid: Place your drain pan directly under the drain plug. Slowly remove the bottom drain plug and let the old fluid empty completely. This typically takes about 10 to 20 minutes.
Inspect the Drain Plug: Most drain plugs are magnetic. Inspect the tip of the plug. A light, fine metallic paste is normal wear and tear. However, if you find large metallic flakes, chunks, or gear teeth, you have internal damage that requires professional attention.
Clean and Reinstall the Drain Plug: Clean the plug threads with brake cleaner. Always replace the old crush washer or gasket with a brand-new one. Reinstall the drain plug and torque it to your manufacturer’s exact specifications (typically between 18 to 29 ft-lbs). For a detailed look at torque values on common 4WD systems, see the Jeep JL Transfer Case (T-Case) Fluid Change - Complete Step By Step .
Pump in the New Fluid: Insert the hose of your fluid transfer pump into the fresh bottle of fluid, and the other end into the fill hole. Pump the fluid in slowly.
Fill Until Overflowing: How do you know when it is full? Keep pumping until fluid begins to slowly weep back out of the bottom of the fill hole. Once it starts to drip out, the level is perfect.
Seal It Up: Wipe away any excess fluid, install a new crush washer on your fill plug, screw it in, and torque it to specification.
Clean and Test: Spray the area down with brake cleaner to make future leak checks easier, lower the vehicle, and take it for a short test drive. Check underneath afterward to ensure there are no slow drips.
Choosing the Right Fluid and Avoiding Common Mistakes
Choosing the correct fluid for your transfer case is not like choosing windshield washer fluid. It is a highly precise science, especially when dealing with European cars.

Decoding Fluid Specifications and Capacities
There is no "one-size-fits-all" transfer case fluid. Depending on your vehicle's make, model, and drivetrain configuration, your transfer case might require:
Specialized Gear Oil: Such as a 75W-90 GL-5.
Automatic Transmission Fluid (ATF): Many modern electronic transfer cases actually use high-grade ATF (like Dexron VI or ATF+4) to lubricate their internal clutches.
Proprietary OEM Fluids: Brands like Mercedes-Benz, BMW, and Porsche often require highly specific, proprietary fluids designed exclusively for their multi-plate wet clutch AWD systems.
Always consult your owner's manual to find the exact viscosity and specification required. Using the wrong fluid can lead to clutch slippage, rapid wear, and total system failure within a few hundred miles. Most passenger car transfer cases are relatively small, holding between 1.5 to 2.5 quarts of fluid (some compact AWD units hold less than a single quart!). Because the volume is so small, upgrading to a high-quality synthetic fluid is a highly cost-effective way to get better thermal stability and wear protection.
Pitfalls to Avoid During Service
Even experienced DIYers can run into trouble if they rush the job. Keep these common pitfalls in mind:
The Stuck Fill Plug: We cannot stress this enough—always remove the fill plug first.
Overtightening the Plugs: Transfer case housings are almost always made of cast aluminum. Aluminum is soft. If you tighten the steel plugs too hard without a torque wrench, you will strip the threads right out of the housing, resulting in an expensive leak that is incredibly difficult to repair.
Reusing Old Crush Washers: Crush washers are designed to deform once to create a perfect, microscopic seal. Reusing them almost guarantees a slow, annoying fluid leak over time.
Failing to Level the Vehicle: If you raise only the front of your car to perform the service, the fluid will pool toward the back of the case. You will end up underfilling the unit, leaving vital bearings dry.
Making the Choice: DIY or Professional Service?
For many car owners, the satisfaction of working on their own vehicle is unmatched. However, when it comes to high-end German engineering, the line between a simple DIY job and a potential mechanical nightmare can be incredibly thin.
Deciding whether to tackle this yourself or bring it to a specialized shop comes down to your comfort level with tools, your available time, and the complexity of your specific vehicle. Staying on top of your Factory Scheduled Maintenance is essential, but how you get there is up to you.
DIY vs. Professional Transfer Case Fluid Replacement
While changing the fluid on an older 4WD truck is relatively straightforward, modern European luxury vehicles are a different story.
On many late-model Mercedes-Benz and BMW vehicles, the transfer case is tightly packaged next to hot exhaust pipes, catalytic converters, and complex frame crossmembers. Accessing the plugs can require specialized low-profile tools, removing multiple underbody panels, or temporarily supporting parts of the exhaust system.
Furthermore, some modern AWD systems use electronic actuators and internal wet clutches that require specialized OBD-II diagnostic scanners to perform a "fluid wear adaptation reset" after a service. Without this electronic reset, the vehicle's computer may continue to operate the internal clutches under the assumption that the old, degraded fluid is still inside, leading to rough shifting and accelerated wear.
If you want peace of mind, professional service offers:
Warranty Protection: Documentation that your scheduled maintenance was done by certified professionals.
Advanced Diagnostics: The ability to scan for hidden drivetrain fault codes.
Stress-Free Execution: No dealing with stubborn, rusted plugs or disposing of toxic used oil.
For drivers in South Florida looking for expert care, visiting a dedicated shop specializing in German Auto Repair Pompano Beach ensures that your precision-engineered vehicle receives the exact OEM fluids and factory-specified care it deserves.
Frequently Asked Questions About Transfer Case Maintenance
We hear a lot of questions about transfer cases at our shop. Here are the answers to some of the most common inquiries we receive from drivers looking to protect their drivetrains.
What happens if I put the wrong fluid in my transfer case?
Putting the wrong fluid in your transfer case is a recipe for disaster. Different fluids have highly specific friction modifiers, viscosities, and heat-resistance packages. If you put standard gear oil into a transfer case designed for thin automatic transmission fluid, the oil will not be able to flow into the tight clearances of the bearings, leading to rapid overheating and gear grinding. Conversely, putting thin fluid into a case that requires heavy gear oil will result in inadequate lubrication, causing the gears to wear down and fail prematurely.
How do I know if my transfer case fluid is low or contaminated?
The most common signs of low or contaminated fluid are mechanical noises and physical feedback. You might hear a distinct whining or growling noise that increases in pitch as you drive faster. You might also feel a strange shuddering or vibration when making sharp turns at low speeds. Visually, look for dark brown or black fluid leaks underneath the center of your car. If you pull the fill plug and the fluid looks milky or opaque, it has been contaminated with water and must be changed immediately.
Do I need to warm up the fluid before draining?
Yes, we highly recommend taking your vehicle for a quick 10-to-15-minute drive before draining the fluid. Cold transfer case fluid is thick and sluggish, meaning it will drain very slowly and leave a significant amount of old oil trapped inside. Warming up the fluid lowers its viscosity, allowing it to flow freely. Additionally, driving the car stirs up any microscopic metal particles and debris resting at the bottom of the case, allowing them to be flushed out cleanly with the draining oil.
Conclusion
Your vehicle's AWD or 4WD system is what gives you the confidence to tackle wet roads, sudden downpours, and weekend adventures. But that system is only as strong as the fluid protecting its core. Ignoring your transfer case fluid is a gamble that simply isn't worth the risk of a massive drivetrain failure.
Whether you decide to tackle this maintenance project in your own garage or hand the keys to a professional, keeping your fluid fresh is the single best way to ensure your vehicle runs smoothly for years to come.
At Mercedes Mike, our decades-experienced technicians use the latest factory tools and exact OEM fluids to keep your German luxury vehicle performing at its peak. If you are located in Pompano Beach, Deerfield Beach FL, or anywhere in the South Florida area, we are here to help.
Don't wait for the telltale whine of dry gears to tell you there's a problem. Visit our Services page today to schedule your professional transfer case service and keep your drivetrain operating exactly as the engineers intended.