

DIY AC Vent Repair: Easy Fixes for Car and Home Vents
When AC Vents Break, Your Comfort (and Wallet) Pay the Price
AC vent repair is something most car and homeowners will face at least once — and putting it off almost always makes things worse.
Here's a quick overview of the most common fixes:
Problem Likely Cause Quick Fix Water dripping from vent Clogged drain line or frozen coil Clear drain, replace filter Weak or no airflow Dirty filter, blocked duct, broken louver Clean filter, adjust or replace louver Rattling noise Loose vent cover or debris inside Tighten screws, remove debris Broken car vent tab Physical damage or phone mount stress Replace vent tab ($15 DIY) Vent cover won't stay up Worn screw holes in drywall Furring strip + drywall patch
Whether you drive a BMW, Mercedes, or own a home with central air, a broken or leaking vent is more than an annoyance. Leaky air ducts alone can bleed up to 30% of your conditioned air before it ever reaches a room. On the car side, dealer shops routinely charge $200–$250 to swap a single vent — sometimes far more for luxury vehicles.
The good news? Many of these problems are fixable yourself, with basic tools and a little know-how.
This guide covers both home HVAC vents and car AC vents — what breaks, why it breaks, and exactly how to fix it.
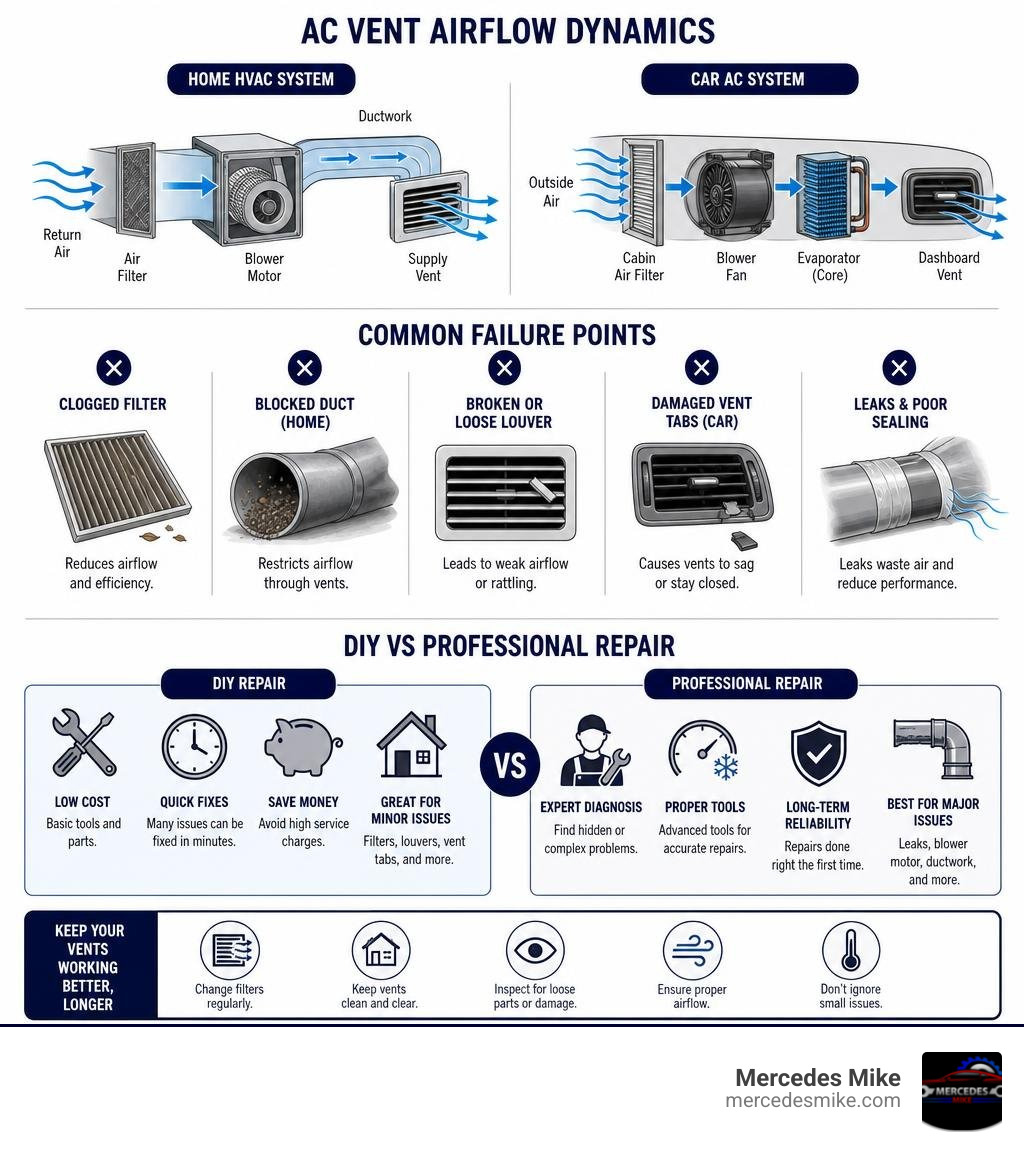
Common Causes of AC Vent Problems
To fix a broken vent, we first have to understand what went wrong. AC vents in both homes and cars operate under constant temperature swings, vibration, and physical handling. Over time, these factors take a toll.
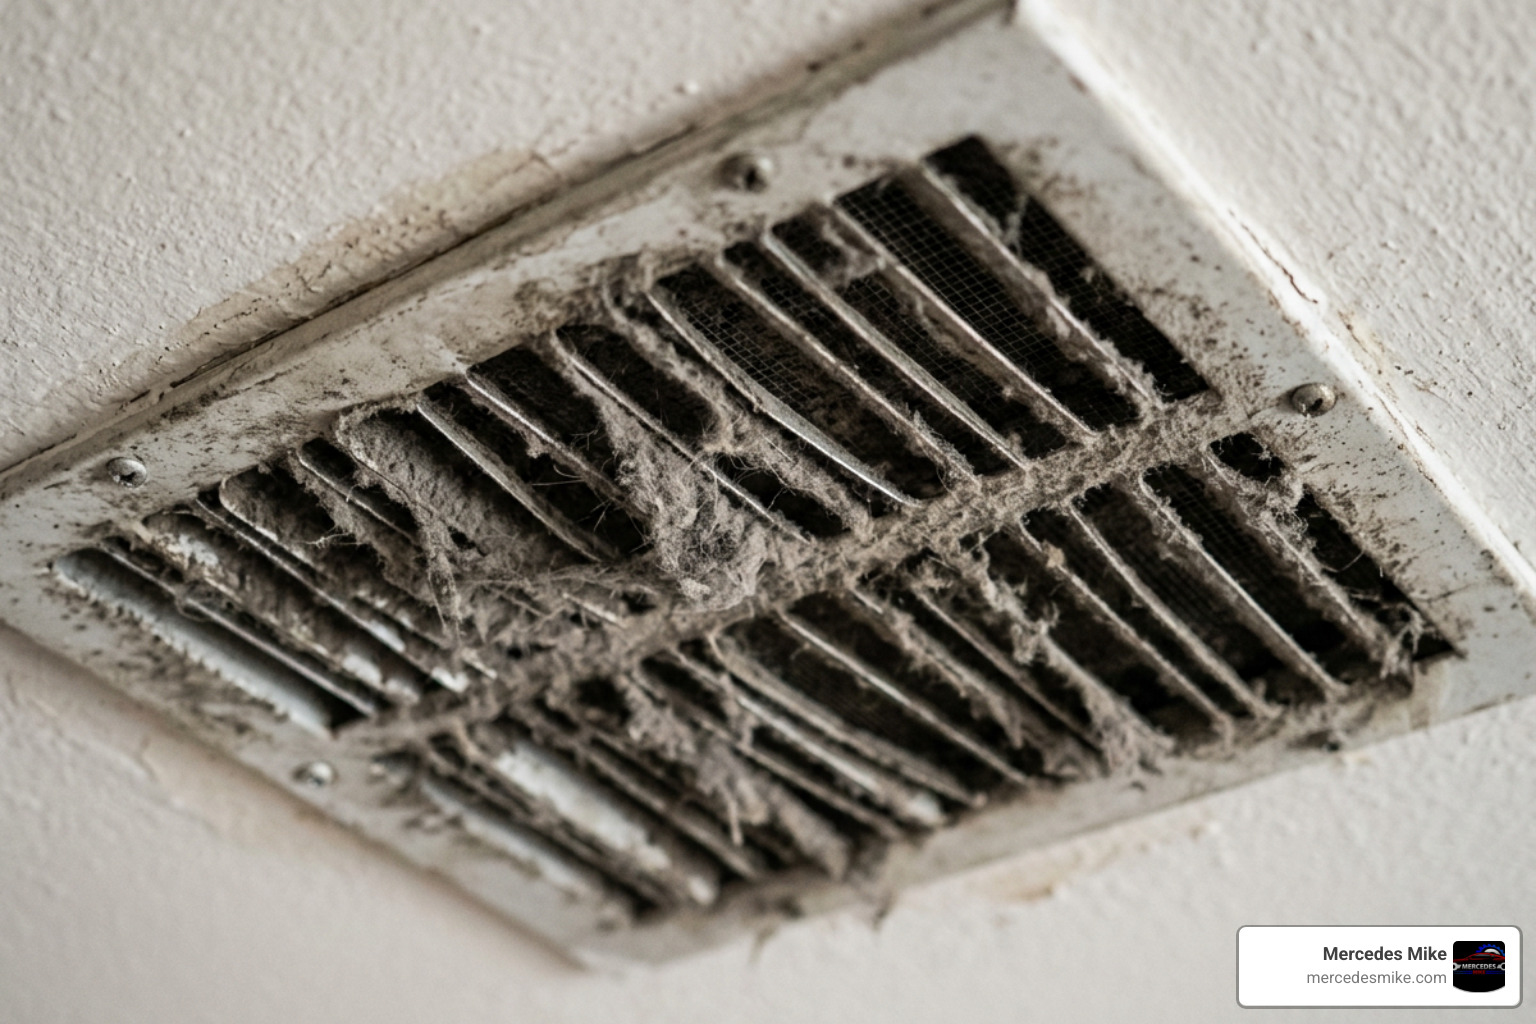
1. Dust and Debris Accumulation
In our homes, air vents act as the final gateway for conditioned air. Over months of operation, dust, pet dander, and microscopic debris cling to the louvers (the adjustable slats). In dry or high-dust environments, this buildup can become so thick that it physically restricts airflow, forcing your HVAC system to work harder and driving up utility bills.
2. Physical Damage and Wear
Car vents are handled daily. We adjust them to point directly at our faces, clip heavy phone mounts to them, and sometimes bump them accidentally. Standard plastic vent tabs and louvers become brittle from constant exposure to hot South Florida sun and cold air conditioning, making them highly susceptible to snapping.
3. Water Leaks and Condensation
If you notice water dripping from a ceiling vent, it is a warning sign of a deeper system issue. The most common culprits are a clogged condensate drain line or frozen evaporator coils. When the drain line backups, or when ice on the coils melts rapidly, the water has nowhere to go but down through your ductwork and out your vents. If left unaddressed, water damage repairs can easily reach upwards of $6,000.
4. Leaky and Damaged Ductwork
Ductwork in attics or crawlspaces can tear, sag, or disconnect. According to energy studies, leaky air ducts can lose up to 30% of conditioned air, which dramatically lowers the pressure and airflow coming out of your vents.
Diagnosing Home HVAC Vent Issues
Before pulling out your toolbox, you need to identify whether the issue is localized to the vent cover itself or stems from the larger HVAC system.
Condensation on the Vent Cover: This usually occurs when cold metal vents meet warm, humid indoor air. It can also point to dirty filters or uninsulated ductwork running through a hot attic. To prevent this, keeping up with regular AC Unit Maintenance is crucial.
Weak Airflow from a Single Vent: If only one room feels warm, check if the vent damper is closed. If it is open, you may have a disconnected or crushed flex duct behind the wall or ceiling.
Rattling or Vibrating Noises: This is usually caused by a loose vent cover, loose screws, or a small piece of debris trapped inside the duct boot directly behind the grille.
Musty or Moldy Odor: If the air coming out of your vents smells damp or musty, standing water in your drain pan or biological growth inside the dark, humid environment of your ducts is likely to blame.
Diagnosing Car AC Vent Issues
Car AC vents suffer from unique mechanical failures because of their lightweight, compact design.
Broken Vent Tabs: The small plastic clip used to direct the air left, right, up, and down is the single most common failure point. These often snap when adjusting the vent too forcefully or when using clip-on phone mounts.
Loose or Floppy Louvers: If your vent slats drop down and point toward the floor no matter how many times you adjust them, the internal tension clips or connecting bars have likely slipped out of their tracks or broken entirely.
Uneven Airflow Across the Dash: If air blows hard out of the passenger side but barely crawls out of the driver's side, you are likely dealing with a stuck blend door actuator deep inside the dashboard rather than a broken vent register. For luxury German SUVs, diagnosing these complex cabin air issues is a routine part of specialized Audi Q5 AC Repair and similar premium vehicle services.
Step-by-Step Guide to DIY AC Vent Repair
Many ac vent repair jobs can be completed safely at home with basic household tools. Let's look at what you will need and how to tackle these repairs step-by-step.

Recommended Tools and Materials
For Home Vent Repairs For Car Vent Repairs Safety goggles & gloves Replacement vent tabs/clips Drop cloth (to catch drywall dust) Needle-nose pliers Screwdrivers (Flathead & Phillips) Plastic trim removal tools Jab saw & utility knife Cyanoacrylate (CA) super glue Furring strips & wood screws Microfiber cloth Drywall patch & spackle Mild interior cleaner Mastic sealant & foil tape
DIY Home AC Vent Repair Steps
One of the most common residential vent issues occurs when the drywall surrounding a ceiling vent crumbles, leaving the mounting screws with nothing to grip. Here is how to rebuild the mounting area and securely reattach your vent cover.
Step 1: Safety First
Put on your safety goggles and gloves. Set up a drop cloth directly beneath the ceiling vent to catch falling drywall dust, insulation, and old screws.
Step 2: Remove the Vent and Inspect
Unscrew the remaining screws holding the vent cover. If the screws spin in place without coming out, gently pry down on the vent frame with a flathead screwdriver while turning the screw to help it catch. Once removed, inspect the duct boot to see if the vent can be screwed directly into the metal duct frame. If the duct boot is too far recessed or damaged, you will need to patch the drywall.
Step 3: Cut Out the Damaged Drywall
Using a pencil and a straightedge, mark a clean rectangle around the damaged drywall surrounding the vent opening. Carefully cut along your lines using a manual jab saw, making sure not to cut into the metal ductwork or any nearby electrical wiring.
Step 4: Install Furring Strips
Cut two small wooden furring strips (about 2 inches longer than the opening you cut). Insert a strip into the ceiling cutout so it bridges the gap behind the good drywall. Hold it tightly in place and secure it by driving wood screws through the face of the existing ceiling drywall directly into the wood strip. This creates a solid wooden backing to screw your new drywall patch into.
Step 5: Fit and Secure the Drywall Patch
Measure and cut a piece of replacement drywall to fit perfectly into the rectangular cutout. Hold the patch in place and screw it directly into the wooden furring strips.
Step 6: Seal and Finish
Apply drywall joint tape over the seams, cover with a thin layer of joint compound (spackle), and let it dry. Sand the area smooth, apply a second coat if necessary, and paint the patch to match your ceiling.
Step 7: Reinstall the Vent Cover
Drill small pilot holes into your newly reinforced ceiling structure, insert heavy-duty drywall anchors if you aren't hitting the wooden furring strips directly, and screw the vent cover back into place.
Note: If you are dealing with deeper ductwork leaks or condensation issues while working on your vents, sealing the metal boot joints with professional mastic sealant or foil tape is highly recommended. While residents on the Gulf Coast might look into professional AC Vent Repairs in Naples, FL or regional services like AC Vent Repairs in Estero, FL and AC Vent Repairs in Punta Gorda, FL, local South Florida homeowners can easily handle these basic surface patches themselves.
Sourcing Parts for Car AC Vent Repair
For automotive vents, you rarely have to replace the entire vent assembly unless the housing itself is cracked.
Replacing Broken Vent Tabs: Instead of paying a dealership hundreds of dollars, you can purchase aftermarket replacement vent tabs online (often for around $15 to $20). These clever, patent-pending designs clip directly onto the existing louver grid without requiring you to remove the dashboard trim.
Realigning Loose Louvers: If a louver has popped out of its side track, you can often use a pair of needle-nose pliers to gently flex the plastic slat and pop its tiny mounting pin back into its corresponding hole.
Handling Tougher Repairs: If the internal linkage bar that coordinates the movement of all the slats has fallen off, you may need to use plastic trim removal tools to gently pop the vent register out of the dashboard to access the rear mechanism. If you are performing a comprehensive interior overhaul or general AC Repair on your vehicle, taking your time with these delicate plastic components prevents further breakage.
When to Call a Professional HVAC or Auto Technician
While cleaning grilles and replacing basic plastic tabs are perfect weekend DIY projects, some AC issues require professional tools, licensing, and expertise.
For Home HVAC Systems:
Refrigerant Leaks: If your home AC is running constantly but blowing lukewarm air, you may have a leak in your evaporator or condenser coils. Handling refrigerant requires EPA certification. If you suspect a leak, you should book a professional Refrigerant Leak Repair immediately.
Electrical Failures: If your outdoor condenser fan isn't spinning, or you hear a loud humming noise when the system tries to start, you likely have a blown capacitor or contactor. Working inside these electrical panels carries a high risk of electrical shock.
Major Ductwork Redesign: If your airflow is severely unbalanced across your home, a professional technician must use specialized flow hoods and manometers to balance the system according to Manual D design principles.
For Automotive Systems:
Dashboard Removal: On many modern luxury vehicles, replacing a damaged passenger or center vent requires removing large sections of the delicate leather and wood dashboard trim. One wrong pry can cause thousands of dollars in cosmetic damage. For example, a center vent assembly replacement part for a 2019 BMW X5 was listed at $2,000, and a single mistake during installation can be incredibly costly.
Refrigerant Recharging: If your car's cabin isn't getting cold, the system likely needs a professional evacuation and recharge using specific equipment to measure the exact weight of R-134a or R-1234yf refrigerant required.
Frequently Asked Questions about AC Vents
Why is water dripping from my AC vent?
Water dripping from a home ceiling vent is usually caused by a clogged condensate drain line. As your AC cools your home, it pulls moisture out of the air. This water drips into a drain pan and flows outside. If dust and algae clog this line, the pan overflows, and water travels down your ductwork. Another common cause is a frozen evaporator coil, which occurs due to restricted airflow (like a dirty filter) or low refrigerant. When the ice thaws, it overflows the drain system.
How much does it cost to replace a car AC vent?
Most dealership service centers charge between $200 and $250 to replace a single dashboard AC vent due to high labor rates. If you drive a high-end German vehicle, the cost of the factory parts alone can run significantly higher. However, if the damage is limited to a broken plastic adjuster tab, you can buy a DIY replacement kit online for about $15 and complete the repair yourself in under ten minutes without any tools.
Can a dirty air filter cause poor vent airflow?
Absolutely. A dirty, clogged air filter acts as a massive barrier to your HVAC system's blower fan. It restricts the volume of air that can be pulled into the system, which directly reduces the pressure and volume of air coming out of your supply vents. Over time, this restriction can also cause your evaporator coils to freeze over, completely blocking all airflow and potentially damaging your compressor.
Keeping Your Vents in Top Shape
A little preventive maintenance goes a long way. For your home, make it a habit to inspect and replace your air filters every 1 to 3 months, and gently vacuum your vent grilles during your regular cleaning routine. For your vehicle, avoid attaching heavy phone mounts to your delicate vent louvers, and adjust them gently to prevent snapping the internal plastic linkages.
If you are a luxury car owner in South Florida experiencing weak airflow, unusual dashboard noises, or warm air blowing from your vents, let our team of experts handle the hard work. We specialize in precision diagnostics and repairs for premium German vehicles.
Schedule professional German auto services with us today at our Pompano Beach location to keep your ride cool and comfortable all year long!